
Ribs and Nuts

또 하나의 면도기 복원기: 일본 빈티지 셰벳 리폼 프로젝트
다시 시작된 프로젝트 열기
지난번 스트레이트 면도기 프로젝트가 저에게는 엄청난 성공작이었기 때문에, 이번에는 제 컬렉션 중에서도 특히 좋아하는 일본 빈티지 셰벳 면도기를 리폼해보기로 했습니다. 이건 제가 소장한 유일한 웨지 타입 면도기이기도 해요. 이 면도기를 복원하기로 한 이유는 명확했습니다 — 불행한 사고로 스케일(손잡이)이 부서져 버렸거든요.
어느 날 면도 키트에서 꺼내려다 떨어뜨렸고, 오래되어 부서지기 쉬운 재질이 바닥에 닿는 순간 산산조각 나버렸습니다. 원래는 유리나 도자기 같은 재료를 대체하려고 만든 플라스틱이었지만, 당시 기술력으로는 이름값을 못했죠. 그래도 마지막 순간까지 날을 보호해 준 걸 보면, 고마운 희생이기도 했습니다.
비포 사진은 없지만… 그래도 멋지다!
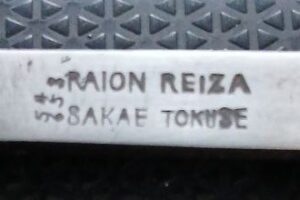
안타깝게도 이 면도기의 복원 전 사진은 찾을 수가 없네요. 다행히 도장(stamp)은 보관되어 있어서, 이건 제 소장품 중 유일하게 장인(artisan)의 도장이 찍혀 있는 면도기랍니다. 멋지지 않나요?
스케일은 새로, 디자인은 독창적으로
어차피 원래의 스케일 디자인은 별로 마음에 들지 않았기 때문에, 재디자인하기로 했습니다. 전통적인 면도기의 스케일은 블레이드보다 길게 만들어서 날을 끼우고 고정하는 방식이지만, 꼭 그럴 필요가 있을까 싶었죠. 오히려 조금 더 짧고 넓게 만들어도 충분히 날을 고정할 수 있다면 더 컴팩트한 디자인이 가능하지 않을까 싶었습니다. 그래서 직접 템플릿을 만들고 실험에 들어갔습니다.
사슴뼈와 월넛의 조화
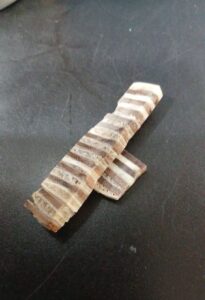
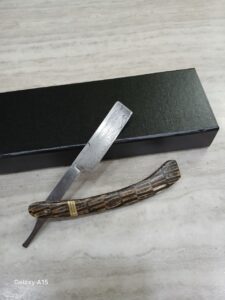
이번 프로젝트는 이전보다 훨씬 야심찼습니다. 사슴의 갈비뼈를 손질해서 납작한 월넛 합판 위에 접착하고, 층층이 뼈와 나무가 번갈아 쌓인 ‘다그우드 샌드위치’ 같은 직사각형 블록을 만들었죠. 그걸 다시 길게 잘라서 사용했습니다.
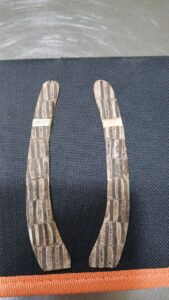
하드우드 프레임 위에 제가 만든 조각들을 바둑판처럼 배열한 뒤, 본격적인 샌딩 작업에 들어갔습니다. 템플릿에 맞게 다듬고, 최종 두께까지 얇게 가공하는 데는 꽤 시간이 걸렸습니다. 이 과정에서 황동 인레이도 넣기 시작했죠.
황동 인레이와 실험적 마감
황동 인레이는 제 기준으로는 괜찮았지만, 완벽하다고는 못 하겠네요. 핀 작업을 마친 후, 저는 또 하나의 실험을 진행했습니다. 이 실험이 실패했다면 지금쯤 전혀 다른 프로젝트 포스트를 쓰고 있었을 겁니다.
핀 대신 자동차 보수제?!
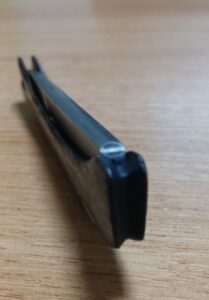
저는 끝부분을 핀으로 고정하는 대신, 자동차 외부 보수에 쓰이는 투파트 본도(bondo)를 사용해 두 스케일을 접착했습니다. 굳기 전까지는 원하는 각도로 조정이 가능했고, 이게 제대로 작동한다면 두 번째 핀은 아예 필요 없겠다는 생각이 들었습니다.
한 줄 감상: 재료에 대해 잘 알면, 결과는 몰라도 예감은 맞는 법이죠.
그 결과, 날이 꽉 들어맞는 안정적인 스케일 끝단이 완성되었습니다.
마무리 작업과 만족스러운 결과물
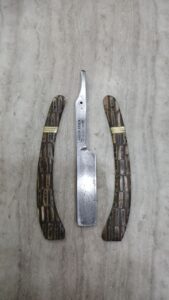
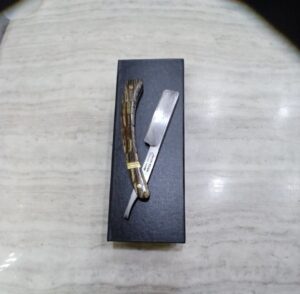
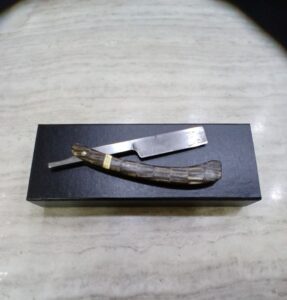
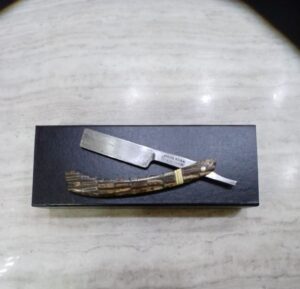
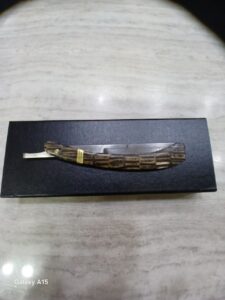
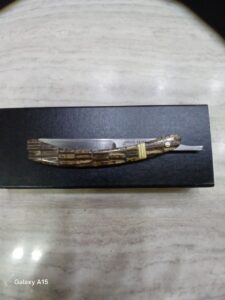
마지막으로 몇 번의 샌딩과 씰링을 거친 뒤, 제가 지금까지 본 면도기 스케일 중 가장 멋진 디자인이 탄생했습니다. 빈티지 장인 정신에 한 걸음 다가간 것 같아요. 물론 황동 세공 실력은 아직 갈 길이 멀지만요. 사실 이 ‘샌드위치-단면-체커보드’ 방식이 작동할지조차 확신은 없었는데, 그냥 떠오른 아이디어였습니다.
그런데 보세요. 원래보다 약 2.5cm 더 컴팩트하고, 부품 수도 줄어든 커스텀 셰벳이 눈앞에 있잖아요. 앞으로 얼마나 버틸지는 두고 봐야겠지만, 지금으로선 꽤 단단해 보입니다.
마무리 한 마디
이번 프로젝트는 저에게 두 번째 ‘승리’였습니다. 이런 기세라면… 이제는 날까지 직접 만들어야 할지도 모르겠네요. 제 손에 남은 날이 얼마 없거든요. 🙂
A Razor Reborn: My Second Blade Restoration
After my last straight razor project was such a massive hit… with me, I decided to refurbish a vintage Japanese shavette razor that happens to be one of my favorite razors in my collection (and the only wedge razor I own). That decision came largely due to the fact that it was lacking scales due to a rather tragic backstory.
The Fall and the Fail of 20th Century Plastics
One day, while taking it out of my shave kit, I dropped it. The revolutionary material that surrounded the blade, brittle with time and truly an embarrassment to the molecular fortitude of plastics of its era, shattered on impact like the glass (or clay) it had been sent to replace. Rubbermaid “brilliant” it was not. But, to be fair, it did one last, admirable and sacrificial job of protecting the blade before making itself into an 8-piece puzzle.
A Rare Maker’s Mark
I wanted a “before picture” but I cannot find ANY of this particular blade. Here’s the stamp. From what I can tell, it’s stamped with both a company and the blade maker. It’s the only razor I own that has an artisan stamp on it. Pretty cool, huh?
Rethinking the Traditional Scale Design
The broken scales were no matter—I was going to replace them anyway because they were ugly and boring. With it in pieces, I decided I didn’t really need to mimic the original design, did I?
Typically, razor handles extend beyond the blade and hold it in place by pinching it in a taper. But I started wondering: why not go shorter and slightly wider while keeping enough wall tension to safely sheath the blade? This could make for a more compact design—perfect for an already compact razor.
So I tested the idea. I designed my own template and slowly got to work over a period of… well, periods.
Enter: The Bone and Walnut Sandwich
This project was significantly more ambitious than the last. I took deer rib bones, cut and glued those flattish pieces onto flat walnut ply, and ended up with a real “Dagwood Sandwich” of alternating bone and wood layers.
Then I cut that rectangular block into long cross-sections.
From Sandwich to Scales
I used my template to make a hardwood skeleton, placed the bone-wood cross-sections across it like a checkerboard, bonded them, and started sanding. First to match the template, and then to thin them down to the proper thickness for a razor handle.
I also started inserting the inlay at this point—brass inlay, to be exact. It works for me, but it’s clearly not perfect. Still, I haven’t really gotten into metallurgy yet.
A Bold Final Assembly
After pinning the blade in place, I made a late decision to test another theory. Rather than adding a second pin at the end, I used two-part bondo (used for repairing car body damage) to permanently bond the scales.
This gave me a window to perfectly set the grip—and it worked great! Otherwise, you’d be reading about a completely different project right now.
Side Note: I love when I know a material well enough to be right about an outcome, even when I’m not entirely sure what that outcome will be.
The Final Product
After a few coats of sealant and more sanding, I ended up with one of the classiest sets of scales I’ve ever seen. A true step toward the vintage craftsmanship I was seeking.
My brass work needs more practice, but my “checkerboarded” construction method? That worked. And now I’ve got a custom shavette that’s about 2.5 cm more compact than the original with fewer moving parts. It feels really sturdy—for now, anyway.
The Verdict? A Solid Win.
This is a second “win” for me. If I keep this up, I may have to learn how to make blades… because I’m running out of my own to work on. 🙂
또 하나의 면도기 복원기: 일본 빈티지 셰벳 리폼 프로젝트
다시 시작된 프로젝트 열기
지난번 스트레이트 면도기 프로젝트가 저에게는 엄청난 성공작이었기 때문에, 이번에는 제 컬렉션 중에서도 특히 좋아하는 일본 빈티지 셰벳 면도기를 리폼해보기로 했습니다. 이건 제가 소장한 유일한 웨지 타입 면도기이기도 해요. 이 면도기를 복원하기로 한 이유는 명확했습니다 — 불행한 사고로 스케일(손잡이)이 부서져 버렸거든요.
어느 날 면도 키트에서 꺼내려다 떨어뜨렸고, 오래되어 부서지기 쉬운 재질이 바닥에 닿는 순간 산산조각 나버렸습니다. 원래는 유리나 도자기 같은 재료를 대체하려고 만든 플라스틱이었지만, 당시 기술력으로는 이름값을 못했죠. 그래도 마지막 순간까지 날을 보호해 준 걸 보면, 고마운 희생이기도 했습니다.
비포 사진은 없지만… 그래도 멋지다!
안타깝게도 이 면도기의 복원 전 사진은 찾을 수가 없네요. 다행히 도장(stamp)은 보관되어 있어서, 이건 제 소장품 중 유일하게 장인(artisan)의 도장이 찍혀 있는 면도기랍니다. 멋지지 않나요?
스케일은 새로, 디자인은 독창적으로
어차피 원래의 스케일 디자인은 별로 마음에 들지 않았기 때문에, 재디자인하기로 했습니다. 전통적인 면도기의 스케일은 블레이드보다 길게 만들어서 날을 끼우고 고정하는 방식이지만, 꼭 그럴 필요가 있을까 싶었죠. 오히려 조금 더 짧고 넓게 만들어도 충분히 날을 고정할 수 있다면 더 컴팩트한 디자인이 가능하지 않을까 싶었습니다. 그래서 직접 템플릿을 만들고 실험에 들어갔습니다.
사슴뼈와 월넛의 조화
이번 프로젝트는 이전보다 훨씬 야심찼습니다. 사슴의 갈비뼈를 손질해서 납작한 월넛 합판 위에 접착하고, 층층이 뼈와 나무가 번갈아 쌓인 ‘다그우드 샌드위치’ 같은 직사각형 블록을 만들었죠. 그걸 다시 길게 잘라서 사용했습니다.
하드우드 프레임 위에 제가 만든 조각들을 바둑판처럼 배열한 뒤, 본격적인 샌딩 작업에 들어갔습니다. 템플릿에 맞게 다듬고, 최종 두께까지 얇게 가공하는 데는 꽤 시간이 걸렸습니다. 이 과정에서 황동 인레이도 넣기 시작했죠.
황동 인레이와 실험적 마감
황동 인레이는 제 기준으로는 괜찮았지만, 완벽하다고는 못 하겠네요. 핀 작업을 마친 후, 저는 또 하나의 실험을 진행했습니다. 이 실험이 실패했다면 지금쯤 전혀 다른 프로젝트 포스트를 쓰고 있었을 겁니다.
핀 대신 자동차 보수제?!
저는 끝부분을 핀으로 고정하는 대신, 자동차 외부 보수에 쓰이는 투파트 본도(bondo)를 사용해 두 스케일을 접착했습니다. 굳기 전까지는 원하는 각도로 조정이 가능했고, 이게 제대로 작동한다면 두 번째 핀은 아예 필요 없겠다는 생각이 들었습니다.
한 줄 감상: 재료에 대해 잘 알면, 결과는 몰라도 예감은 맞는 법이죠.
그 결과, 날이 꽉 들어맞는 안정적인 스케일 끝단이 완성되었습니다.
마무리 작업과 만족스러운 결과물
마지막으로 몇 번의 샌딩과 씰링을 거친 뒤, 제가 지금까지 본 면도기 스케일 중 가장 멋진 디자인이 탄생했습니다. 빈티지 장인 정신에 한 걸음 다가간 것 같아요. 물론 황동 세공 실력은 아직 갈 길이 멀지만요. 사실 이 ‘샌드위치-단면-체커보드’ 방식이 작동할지조차 확신은 없었는데, 그냥 떠오른 아이디어였습니다.
그런데 보세요. 원래보다 약 2.5cm 더 컴팩트하고, 부품 수도 줄어든 커스텀 셰벳이 눈앞에 있잖아요. 앞으로 얼마나 버틸지는 두고 봐야겠지만, 지금으로선 꽤 단단해 보입니다.
마무리 한 마디
이번 프로젝트는 저에게 두 번째 ‘승리’였습니다. 이런 기세라면… 이제는 날까지 직접 만들어야 할지도 모르겠네요. 제 손에 남은 날이 얼마 없거든요. 🙂
A Razor Reborn: My Second Blade Restoration
After my last straight razor project was such a massive hit… with me, I decided to refurbish a vintage Japanese shavette razor that happens to be one of my favorite razors in my collection (and the only wedge razor I own). That decision came largely due to the fact that it was lacking scales due to a rather tragic backstory.
The Fall and the Fail of 20th Century Plastics
One day, while taking it out of my shave kit, I dropped it. The revolutionary material that surrounded the blade, brittle with time and truly an embarrassment to the molecular fortitude of plastics of its era, shattered on impact like the glass (or clay) it had been sent to replace. Rubbermaid “brilliant” it was not. But, to be fair, it did one last, admirable and sacrificial job of protecting the blade before making itself into an 8-piece puzzle.
A Rare Maker’s Mark
I wanted a “before picture” but I cannot find ANY of this particular blade. Here’s the stamp. From what I can tell, it’s stamped with both a company and the blade maker. It’s the only razor I own that has an artisan stamp on it. Pretty cool, huh?
Rethinking the Traditional Scale Design
The broken scales were no matter—I was going to replace them anyway because they were ugly and boring. With it in pieces, I decided I didn’t really need to mimic the original design, did I?
Typically, razor handles extend beyond the blade and hold it in place by pinching it in a taper. But I started wondering: why not go shorter and slightly wider while keeping enough wall tension to safely sheath the blade? This could make for a more compact design—perfect for an already compact razor.
So I tested the idea. I designed my own template and slowly got to work over a period of… well, periods.
Enter: The Bone and Walnut Sandwich
This project was significantly more ambitious than the last. I took deer rib bones, cut and glued those flattish pieces onto flat walnut ply, and ended up with a real “Dagwood Sandwich” of alternating bone and wood layers.
Then I cut that rectangular block into long cross-sections.
From Sandwich to Scales
I used my template to make a hardwood skeleton, placed the bone-wood cross-sections across it like a checkerboard, bonded them, and started sanding. First to match the template, and then to thin them down to the proper thickness for a razor handle.
I also started inserting the inlay at this point—brass inlay, to be exact. It works for me, but it’s clearly not perfect. Still, I haven’t really gotten into metallurgy yet.
A Bold Final Assembly
After pinning the blade in place, I made a late decision to test another theory. Rather than adding a second pin at the end, I used two-part bondo (used for repairing car body damage) to permanently bond the scales.
This gave me a window to perfectly set the grip—and it worked great! Otherwise, you’d be reading about a completely different project right now.
Side Note: I love when I know a material well enough to be right about an outcome, even when I’m not entirely sure what that outcome will be.
The Final Product
After a few coats of sealant and more sanding, I ended up with one of the classiest sets of scales I’ve ever seen. A true step toward the vintage craftsmanship I was seeking.
My brass work needs more practice, but my “checkerboarded” construction method? That worked. And now I’ve got a custom shavette that’s about 2.5 cm more compact than the original with fewer moving parts. It feels really sturdy—for now, anyway.
The Verdict? A Solid Win.
This is a second “win” for me. If I keep this up, I may have to learn how to make blades… because I’m running out of my own to work on. 🙂